Read: What is Fondant.
Basics of Fondant
As most of you kow, fondant is made of sugar. When working with fondant, the decorator will have to knead the fondant like it would with dough. Fondant dries very quickly and hardens, therefore, the decorator must work fast with fondant. It is advisable to keep plastic wrap nearby to wrap the fondant when needed and prevent it from being exposed to the air.
If your fondant ever dries, never add any liquid to it as the fondant will go back to its basic sticky form. Hard fondant should be disposed.
Storing Fondant
It is advisable to wrap fondant tightly in plastic wrap. Then place this inside a sealable plastic bag. Make sure you remove all the air when wrapping. Fondant should NOT be stored in the refrigerator. The refrigerator holds moisture, and moisture is not good for fondant. Fondant can be stored in a cool and dry cabinet at room temperature.
Working with Fondant
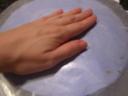
As you knead or work with fondant, your hands can expell body heat and it will soften the fondant In some cases it will feel sticky. Most people feel compelled to use powder sugar to make the fondant less sticky. Note that powder sugar is not the right thickening agent that must be used here. When working with fondant, only use corn starch. Most decorators that work with fondant use a corn starch "puff" that is very easy to make. Buy a disposable cleaning towel as shown below (make sure you buy the one with the thin pores). Place some corn starch in the middle and tighten with a ribbon to make a pouch. Use it as a "puff".
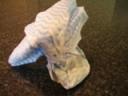
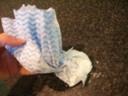
You will use this puff when working with fondant to cover working surfaces or to thicken over-kneaded fondant.
Decorating with Fondant
In order to "glue" pieces of fondant to other fondant, it is advisable to use food flavorings (any flavor). Food flavoring contains alcohol, which evaporates (dries) faster than water. Remember, moisture is not good for fondant as it makes it sticky. Therefore, this will work perfectly.
When gluing fondant to cake frosting or cardboard, you can use piping gel. Piping gel is thick and it can help 'glue' fondant tightly.
Coloring Fondant
Since moisture is not good for fondant, avoid using liquid food coloring to color fondant. I use the wilton gel colors and this works great.
How to-
I pat the fondant into a little pancake. Place desired amount of gel food coloring in the middle. Fold halfway to make a half circle. Press until flat again incorportating the gel into the fondant. Fold again and press. Repeat process until you feel the gel color has incorporated into the fondant. Knead the fondant "dough" to color evenly. I like this process because it avoids getting food color on my hands. You can use disposable gloves (no latex) to tint fondant as well.
Where to Find Fondant
Fondant can be bought or made at home. I usually buy my fondant. I will try and make a couple of recipes and test them. If all goes well, I will post them with comments in the near future. UPDATE: Marshmallow Fondant Recipe
Have fun working with fondant and visit us soon. Let us know how informational this blog was.Click on this link to an earlier post for fondant information:
What is fondant? Marshmallow Fondant RecipeCOMING SOON How to Make Fondant Roses


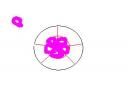
 Note that the flower should be the size of the inner circle


