Diary of a Cake Stylist

An Expression of Art

Tuesday, August 16, 2011

How to Cover a Cake with Fondant

How to Cover a Cake with Fondant
You'll need:

Prepare your cake with a light layer of icing.

Prepare your fondant mat by rubbing a small amount of Crisco to your mat.  Remember, a little goes a long way.  It should be a very thin layer.  This will help your fondant from sticking to the mat and will make the fondant in contact with the mat shinier.  I also prep the rolling pin with a little crisco and dust some cornstarch over it in order to avoid a "sticky situation".

After cutting your fondant piece you have to knead the fondant to make it more pliable (like you would with dough) and be able to roll it. The fondant will be ready once it becomes more pliable and the fondant looses its shine (i.e., becomes opaque).  Do not overknead as the fondant can start to melt (hands expell body heat) and become sticky, therefore, work as fast as you can.  If this occurs, add a little cornstarch to your fondant.  Most decorators use a corn starch "puff".  Here is a link to "Working with Fondant" for quick tips. 


After kneading the fondant, roll it into a ball and place in the middle of your fondant mat.  I recommend using a fondant mat to achieve a smooth surface. 


TIP: It is difficult for me to roll the fondant flat out of a ball.  I recomment that you pat the fondant ball until it flattens on the mat as shown on the picture below.  Then you are ready to roll the fondant.


In this picture I was covering a round 8 inches in diameter cake that was 4 inches high, therefore I had to sum each side and the top --> [4 inches (side) + 8 inches (diameter) + 4 inches (other side) = 16 inches].  Since the total was 16 inches, I had to roll my fondant until it was 16 inches in diameter in order to be able to cover my round 8 inches in diameter cake. 


Roll the fondant from center to the edge to keep the circular shape of the fondant (do not roll from edge to edge). Feel free to rotate the fondant.


Once you are done rolling the fondant, we have to transfer the fondant onto the top of the cake (make sure your already frosted cake is near your rolled fondant for easier transfer). ***Butter Cream Recipe***
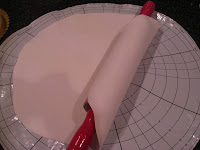


Roll the rolled fondant on your rolling pin so you can gently lift it and place one edge of the fondant over one edge of the cake. Slowly unroll the fondant over the cake (make sure it is centered).


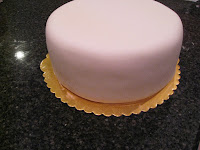
The fondant should drape the cake as shown in this picture.


Shape the fondant to the side of the cake by gently smoothing it with your hands starting on the top center of the cake and outwards and then the sides.  Hands can leave impressions on the cake so make sure you do this gently or use a Fondant Smoother


Press the bottom of the cake to mark the edge and make it easy to trim.


Trim the excess of the cake with a knife.  I use a small pizza cutter for easy cutting... just roll and cut :). You can also buy a Fondant Cutter


Your cake is now ready to decorate.... like a blank canvas. Enjoy!!

Wednesday, June 9, 2010

Zebra Print Fondant

ZEBRA PATTERNS

I try to make my life less complicated when decorating cakes.  Although I love using brush for painting, making a little mistake can take a while to repair.  When trying to paint zebra patterns over white fondant it can get even measier. So here is a quick and easy wait to get perfect zebra patterns on fondant.

All you need is:
  • White fondant
  • Dark fondant (chocolate in this picture)

Instructions:

I'm using a small amount of fondant here for demonstration purposes. So keep your mind open for different zebra patterns over larger surfaces.

1) Knead desired amount of white fondant.
2) Pat the fondant 'dough' over your prepped fondant rolling mat.

3) Knead chocolate (or dark colored) fondant and make logs of fondant in different shapes and sizes. Logs ends should be pointed. Place over patted white fondant creating different paterns (make sure to make Y's here and there). - REFER TO PICTURE


4) Roll the fondant in one direction (e.g., vertically) in order to enlogate the chocolate logs until these get 'incorporated' into the white fondant. The chocolate fondant should looks as part of the white fondant.     -REFER TO PICTURE


5) Continue stretching the fondant to it's desired lenght.
6) If you want to make the patterns a little wider, then roll the fondant across the stips (e.g., horizontally).      - REFER TO PICTURE


7) Cover desired cake with zebra print fondant. Enjoy.

** Come back for animal print cake examples***
                                                                                                                                 

Tuesday, May 11, 2010

The Little Mermaid


The little mermaid cake was a hit at this 7th birthday party!!  All the girls wanted to eat Ariel's flower and the boys wanted to eat the eyes... yes, that's kids nature :). This time, I stayed away from the typical chocolate cake and ventured with a "peaches and cream" cake. A regular sour cream cake with pieces of peaches and filled with pastry filling (similar to whipped cream) with peach pieces as well in order to stay in the same flavor subject. The cake was then covered in butter cream using the star tip method.  It was a hit with both children and adults alike!

The HOW:
I used the Wilton Disney Princess Ariel Cake Pan to bake my "peaches and cream" cake.  I then covered the cake with a thin layer of icing leaving the cake outlines for help.


For decorating this cake I followed the included pan instructions, which suggest piping tips 3, 16 and 21. Black icing is a little difficult to get, so I just used the Wilton Black Icing Tube and attached piping tip #3 as a shortcut. You can attach any piping tip size to these tubes!!


For the eyes, instructions suggested piping blue buttercream, but I wanted to create some depth in the eyes so I tinted some Wilton Piping Gel with a little blue gel icing color.

Although you can buy the little mermaid icing color kit (Disneys Little Mermaid Icing Color Set), I opted for making mine since I can create these colors with the basic set of gel coloring from Wilton that I already own (basic wilton set or Wilton Set of 12).  In order to obtain the skin color icing, I played with brown and pink gel colors on my white buttercream.


Don't forget to pipe the eyelashes. It makes a difference, trust me!!


For more decorating tips please see my previous posts:
Star Tip Decorating - http://thecakestylist.blogspot.com/2007/09/buttercream-star-tip-decoration.html
Buttercream Icing Recipe - http://thecakestylist.blogspot.com/2007/09/buttercream-icing-yield-3-cups.html
Icing Consistency - http://thecakestylist.blogspot.com/2007/09/icing-consistency-buttercream.html


Sunday, April 18, 2010

Fondant Bears


You will need:

  • Brown Fondant

  • Gel colors (brown or black for the nose and eyes)

  • Spaghetti (to support the head of the bear, and if you like, the limbs as well)

  • Toothpick


  • One piping tip (any size)
Getting started:
  1. Roll 2 balls of fondant for body and head of the bear and for logs of fondant for limbs (arms and legs). Remember to proportion these as these will complete body of bear.
  2. Cover your workign area with a small piece of wax paper to prevent the bear from sticking to your working area. 
  3. Press the body of the bear slightly over wax paper, shaping the body to a less rounded form (it's up to you to decide how you want the body of your bear to look)
  4. Insert a dry spaghetti on top and in the middle of the bear to function as the support for the bear's head as shown in the picture below.  Don't attach the head at this time as it is easier to work / mold the head when dettached.
  5. Take one of the limbs that you have rolled before and pich the tip of it upward in order to shape the foot of the bear.  Then pinch the other end (the thigh) so it can fit nicely next tot he bear's body. See picture below.
  6. Repeat for the second leg.
  7. Insert a small piece of spaghetti on the side of the bear's body in order to make sure the leg stays in place.  With cake decorating brush, wet around the sphagetti with some little water (our 'glue' in this case) and attach the limb. Repeat on the other side. 
  8. Now let's work on the bear's arms. Take one of the fondant logs meant to be the arm of the bear and pinch on one end. Repeat for second arm.
  9. Insert a small piece of dry spaghetti on each side of the bear and moisten the side with a wet cake decorating brush and place the arms so they rest on top on the legs (or position arm wherever you like).
  10. Now let's work on the head of the bear.  Roll the second (smaller) ball of fondant, then press in the middle to create a protution (the bear's snout) and pinch slightly in order for the snout to come out a little bit.
  11. Flatten the snout a little bit. Center the head on the palm of your hands and mark the spots where you want the eyes. Press slightly with the back of your brush in order to create the eyes.
  12. Using the back end of one of your piping tips, Mark the mouth of the bear as shown below.
  13. Press slightly with a toothpick in the middle of the mouth to make a small opening. Wet your cake decorating brush slightly and shape the mouth of your bear.
  14. Roll a tiny ball of fondant (this will be your bear's nose). Moisten the back of the ball and press to the middle of the bears snout. We have given the bear a nose.
  15. Place the bear's head on top of the bear's body, making sure that the dry spaghetti inserts through the middle of the bottom of the bear's head.  Make sure it keeps in place.
  16. Roll 2 tiny balls of fondant (this will be the bear's ears) and flatten then on your working surface.  With the back end of your decorating brush, press slightly in the middle in order to indent.
  17. Moisten 2 spots on the top of your bear's head and attach the ears (as shown below)
  18. Dip the end of one toothpick in the gel color of your choice (dark brown shown below) and slighlty insert it in the bear's eyes to give it color. Swirl the toothpick a little bit to make the eyes a little bigger, repeat on the second eye.
  19. With your decorating brush or toothpick, color the nose of the bear.
  20. Roll little balls of fondant and flatten. Press and 'glue' with water to the sole of it's feet.  Paint 3 dark spots to mark the toes.
  21. Allow soem tiem for the fondant and the gel color to dry. Repeat process to make multiple bears of every color and shape :).